When you do what you love doing, the numbers on the mileage, hours on planes, hours slept, coffee consumed, miles walked… all don’t seem to matter much.
When you’re done doing what you love doing, you can’t help but to wonder… What’s next!
Here’s a BTS video of how we did what we did.
– This review is based on personal experiences
– I’m not a ‘tech’ guy
– This review is based on inspiration
– The E-M1 Has got a ‘CP’ sticker on the bottom
– This is personal
“Throw yourself a challenge with subjects that cannot communicate. Your best bet would be having a camera in hand that will capture the moments”
PERSONAL NOTE
My Passion for nature and wildlife photography derived and instilled by my wife who is a Conservation Biologist. I find peace in the forest and it gives me much inspiration in my daily job in the advertising world. Documenting wildlife in the Malaysian jungles is a labour of love – and with this passion, I would like to present the beauty of Malaysia to the world to admire. This time with boots on the ground…running!
I’ve always been a guy driven by passion and i believe that if you’re passionate about it, it will build you. Thank you Olympus Malaysia for believing in me – your support to my wildlife endeavours is truly immaculate.
THE ‘PERSONAL’ CHALLENGE
I’ve been photographing with the 300mm f2.8 for a while now. Since the days of the E-3 & then much more with the E-5. Most of the images produced from my wildlife escapades were either from one of the two DSLR’s. Of course, my setup will include either of the two camera body, the 300mm f/2.8 and the EC-20 2x Teleconverter (EC 2x TC). This setup has proven effective many times.
Personal because I’ve not been shooting much wildlife, stricken with advertising works. I was also delayed the chance of obtaining this gear before the end of 2013 when all my wildlife adventures completed with minimal resources (http://fullcirclepix.com/blog/?p=1149). The upside to this (in which i smile upon now – since it was my birthday – don’t ask) is with the beginning of a new year, translates to the beginning of new challenges. And for this year, I’m going to seek wildlife i’ve either never seen or never photographed well.
To throw another curve ball into this equation… This is my first time using the E-M1 with the 300mm f/2.8! Only possible with the MMF-3. Since birds are abundant and also present in common areas, they posed as the best subjects. Hence, I’ve travelled to highlands & lowlands… in Borneo & central Malaysia. I set out on a journey personal to me & with new gear.
I’m a city boy that love the outdoors : )
With many ‘aaarrrrggghhh!!!’ setbacks in the past with 4/3 setups while deep in the jungles. I could only wonder if the Micro 4/3 + MMF-3 + 300mm f/2.8 could perform to my standards of wildlife photography. At first thought, If i have less of the ‘aaarrrrggghhh!!!’ moments, i’m a winner and the gear on my back is my trophy.
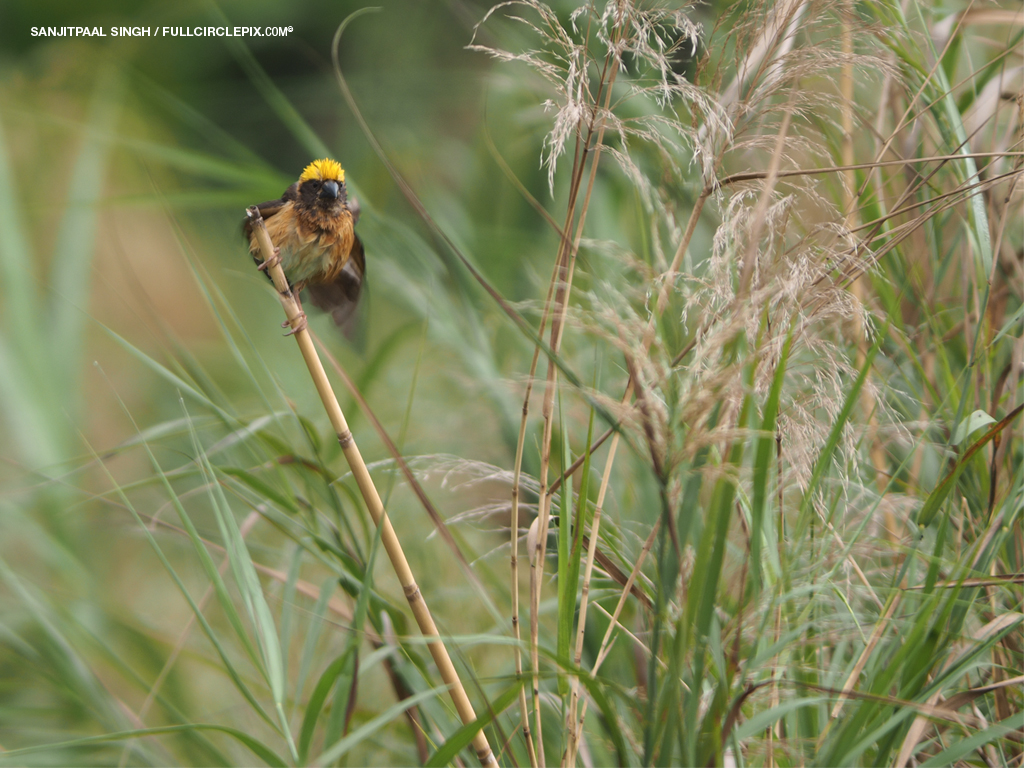
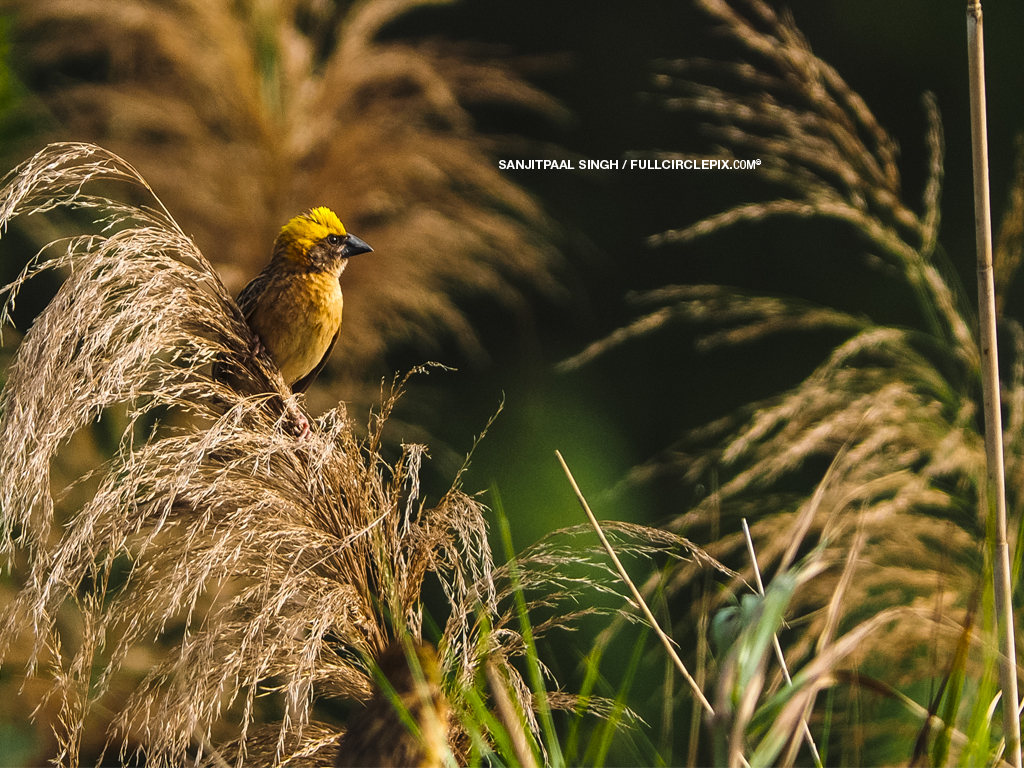
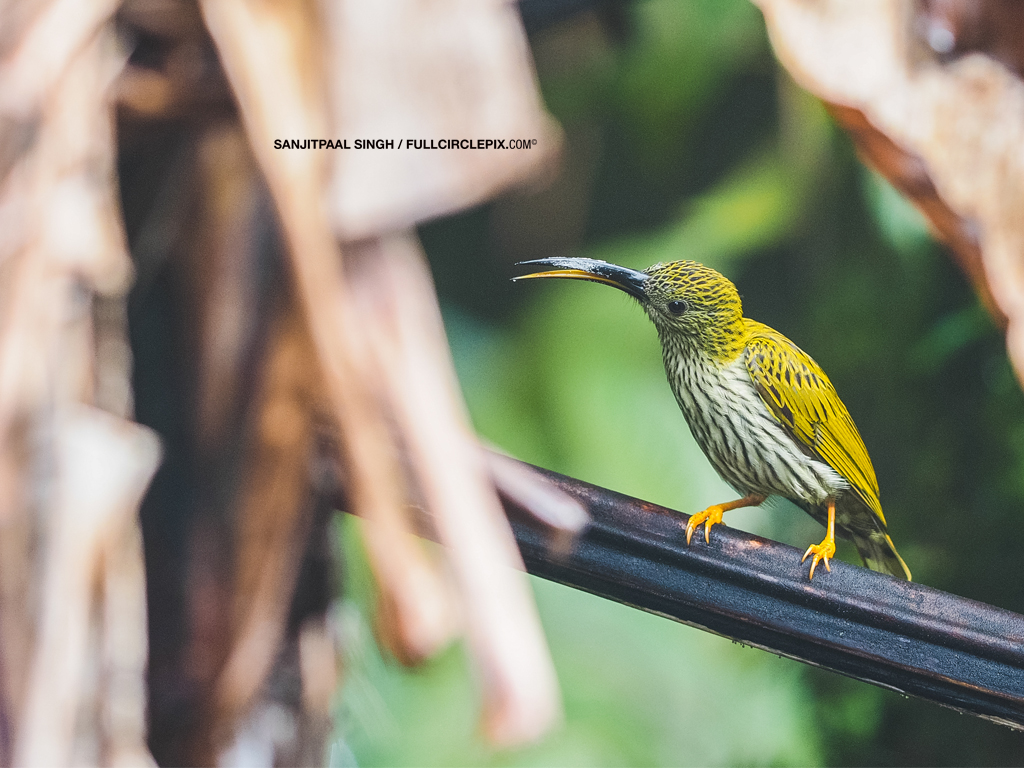
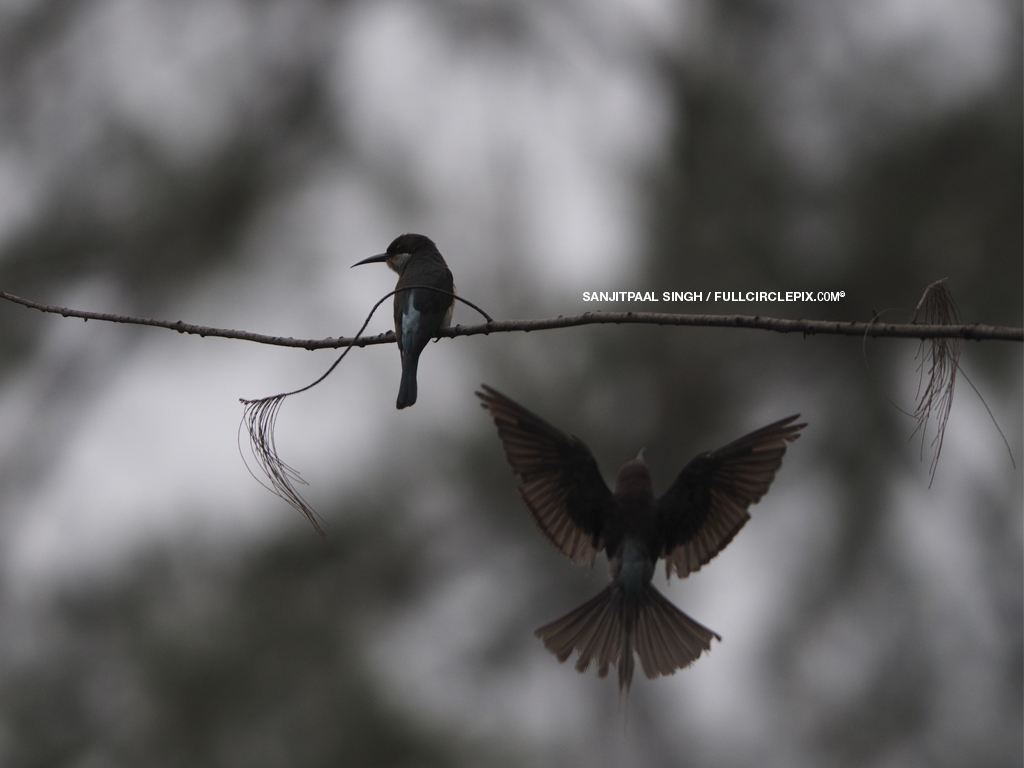
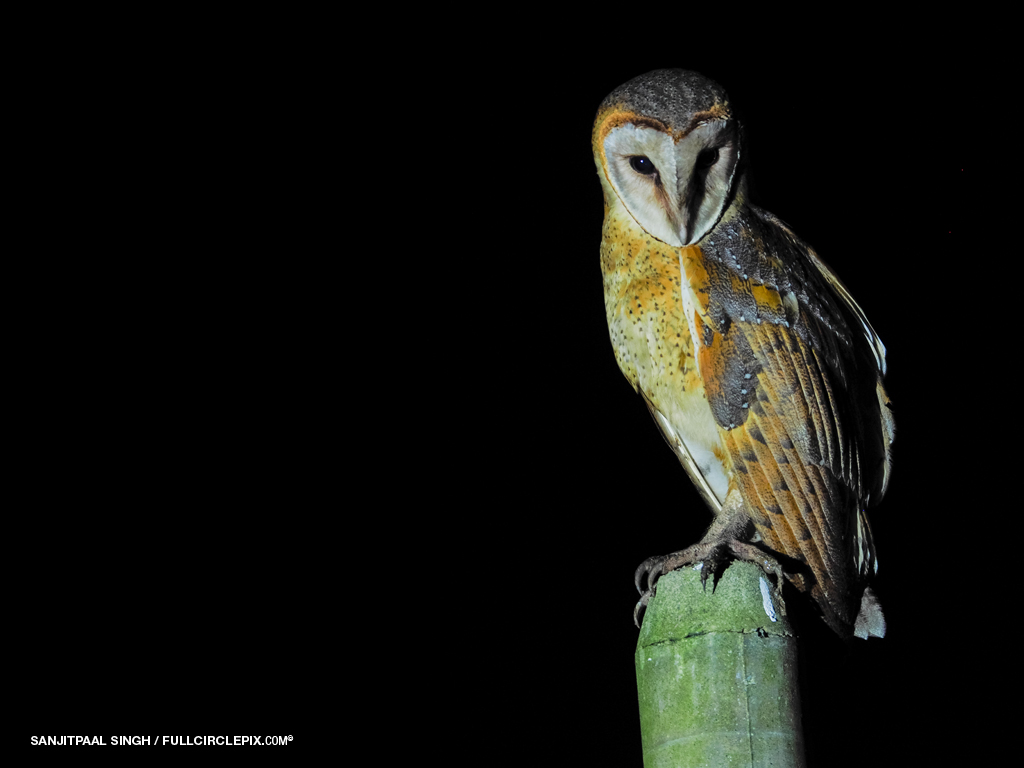
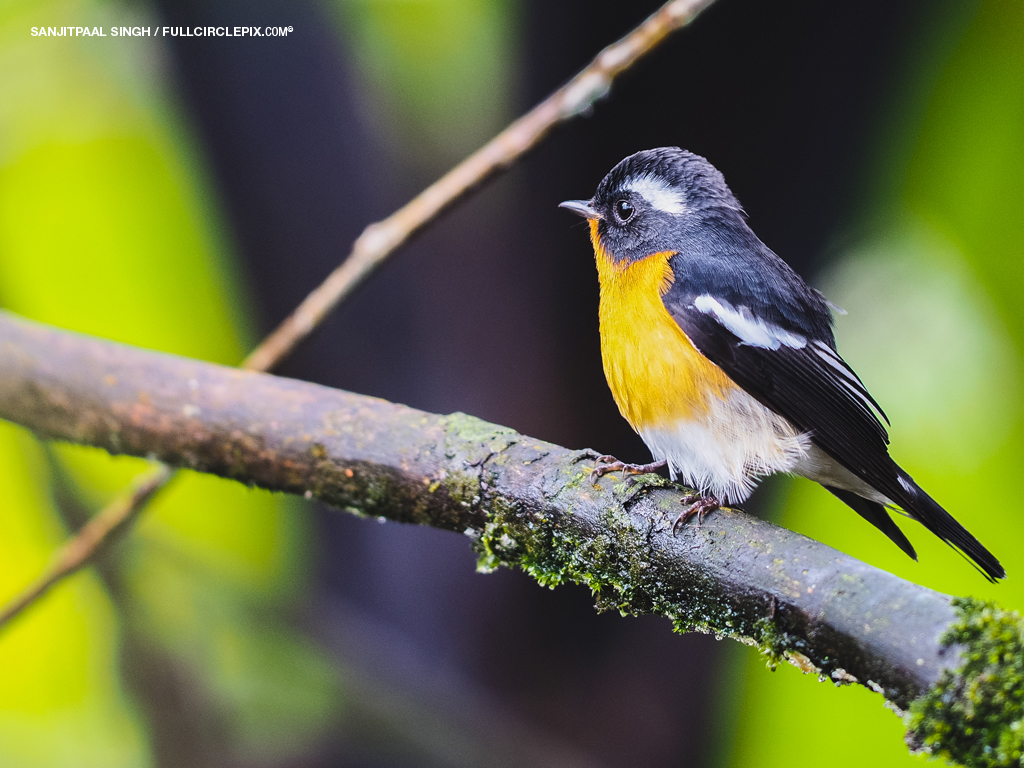
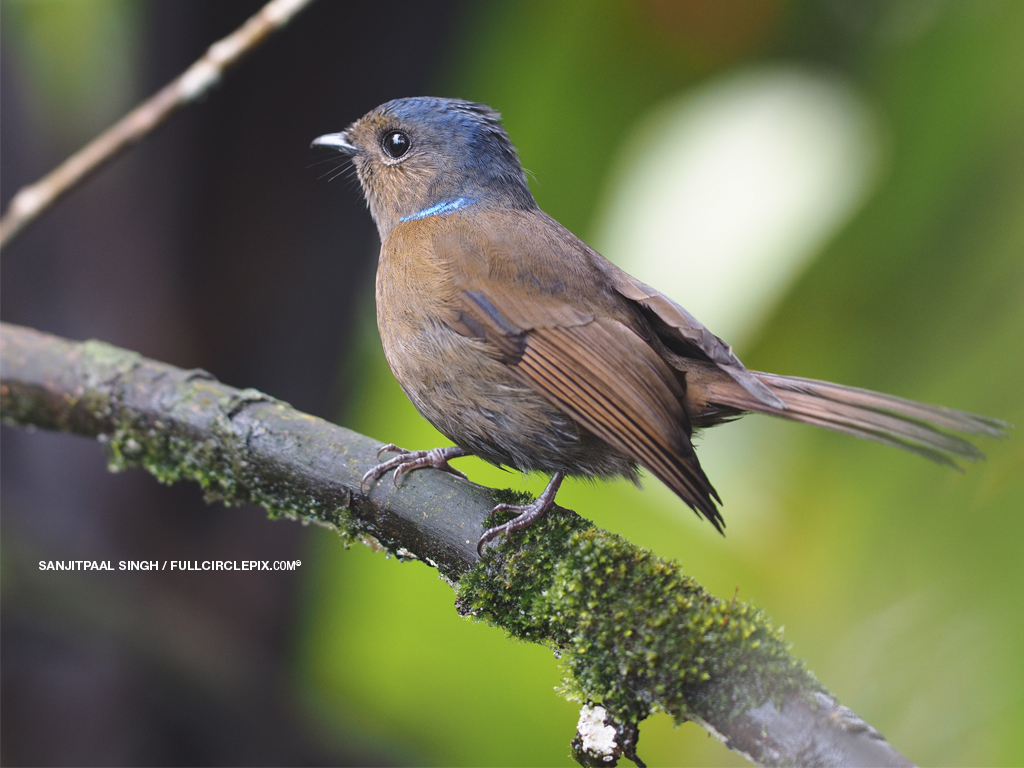
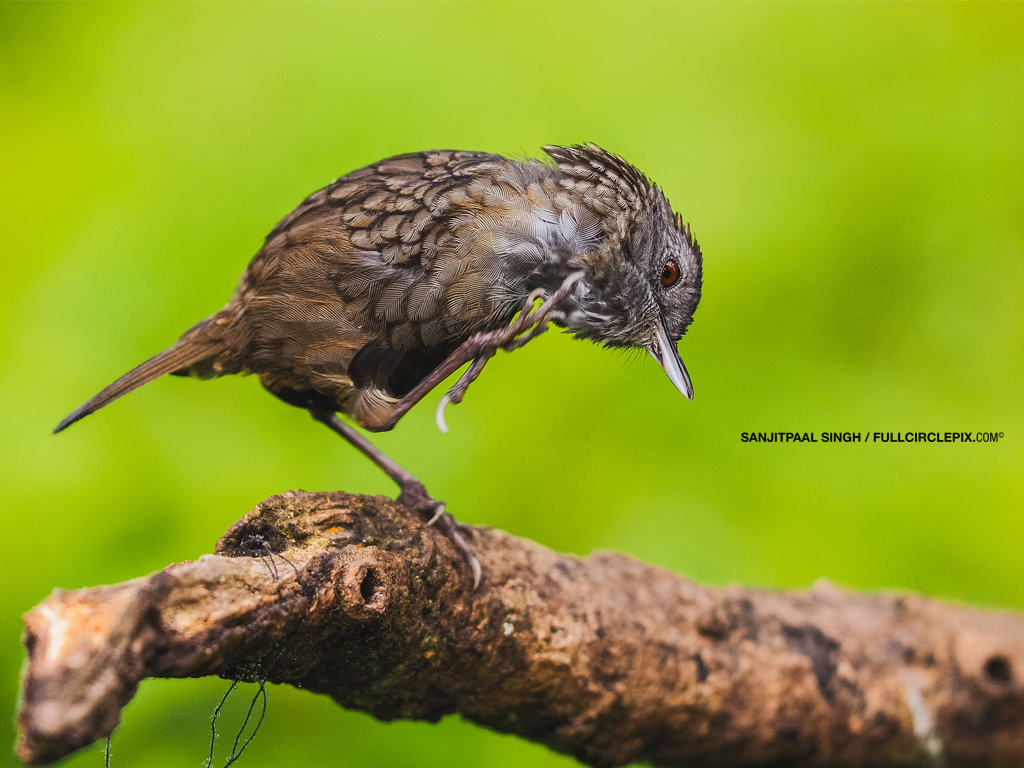
My personal challenge is to set out and photograph some of the most colourful birds in Malaysia. Yet keeping the images simple to a sense that they could be used for advertising and editorial purposes.
You may have guessed it – this review is based on personal experiences, and the pain we go through when given the opportunity to visually document the best of nature and wildlife here is not easy.
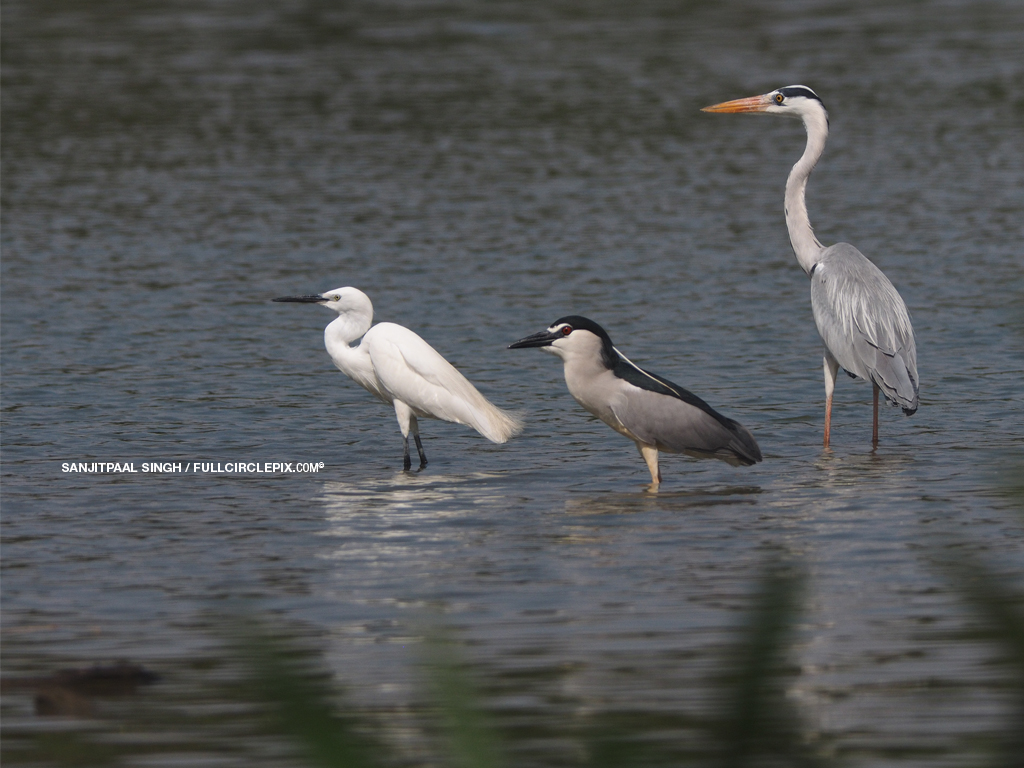
Many bird photographers photograph birds as a collection – i do it to present wildlife behaviour.
Mental note: we preserve
WHY WILDLIFE + THIS SETUP
It’s simple. Malaysia is situated on the equator with tropical climate all year round. Malaysia is one of 17 countries in the world with mega-biodiversity. The forests here is dense with vegetation, making it rough to venture trough, the weather is unpredictable (when away from technology / the ‘experienced’ indigenous and guide) and wildlife is not only tough to spot, even harder to photograph – they are fast, shy, and unpredictable.
Much research is needed to get the best of wildlife, with perseverance, patients, a good team (all with the same traits) the images here was possible.
The 300mm f2.8 when mounted onto the E-System or the Micro Four Thirds System automatically converts to 600mm f/2.8. When the 2x TC is added on, the entire system translates to 1200mm f/5.7. Perfect for a ‘light’ wildlife photography setup.
MY JOURNEY
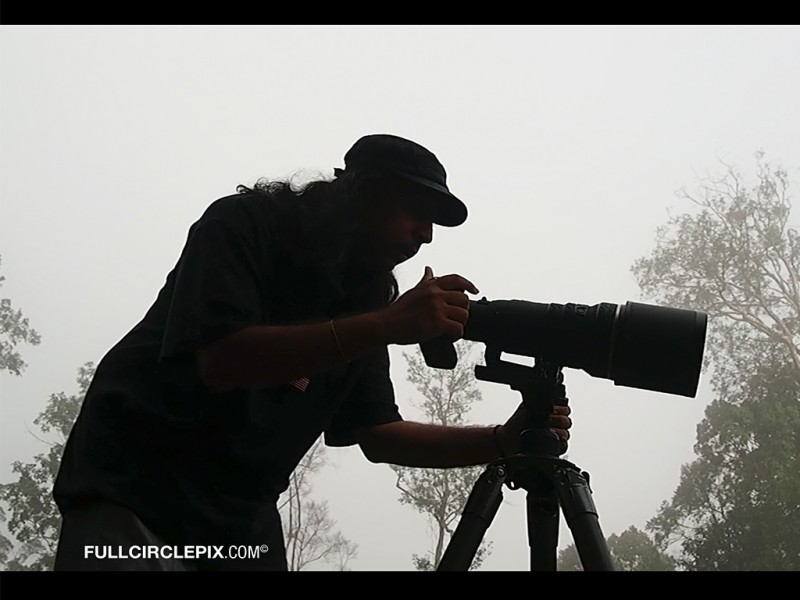
My Journey took me to a couple of states – with my own money, time away from personal deadlines, short adventures that would give my insurance agent a brain aneurism (please don’t tell him).The first couple of days within Kuala Lumpur were used in nearby places to get familiar with the camera setup. I’ve earned my Gitzo 5 series tripod + Wimberley 2 head earlier in 2013 and this is the best time to utilise it to the fullest.
To have embarked on this journey is simply and only that i have a passion – driven with much hope that the E-M1 + 300mm f/2.8 + EC 2x + MMF-3 (my setup) would give me better pictures than i had with 4/3 Systems before.
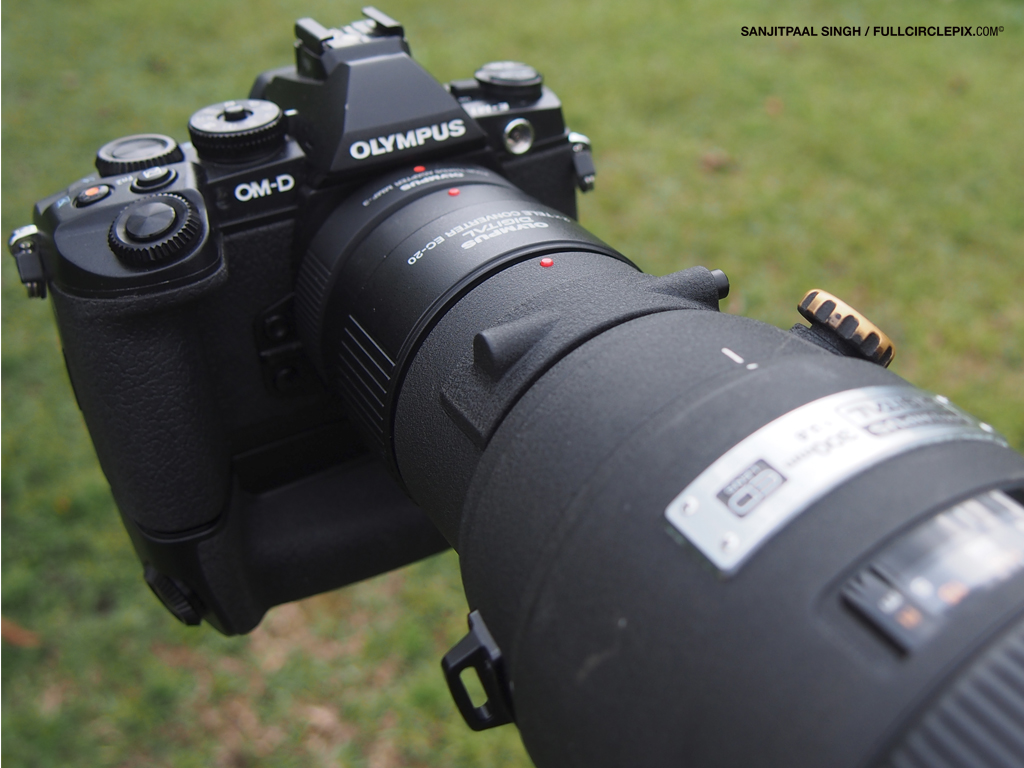
THE SETUP
– Gitzo 5 series
– Wimberley Head II + Plate
– Olympus EM-1 + HLD-7 vertical grip
– 300mm f/2.8
– MMF-3
– EC-20
– Macbook Pro
– Sandisk 32G
– Time
– some money
– Some Stamina,
– A hell lot of patients
– Experienced guide
– More miles on your car then ever in a week
– Wife that loves you regardless
300mm f/2.8 + EC 2x
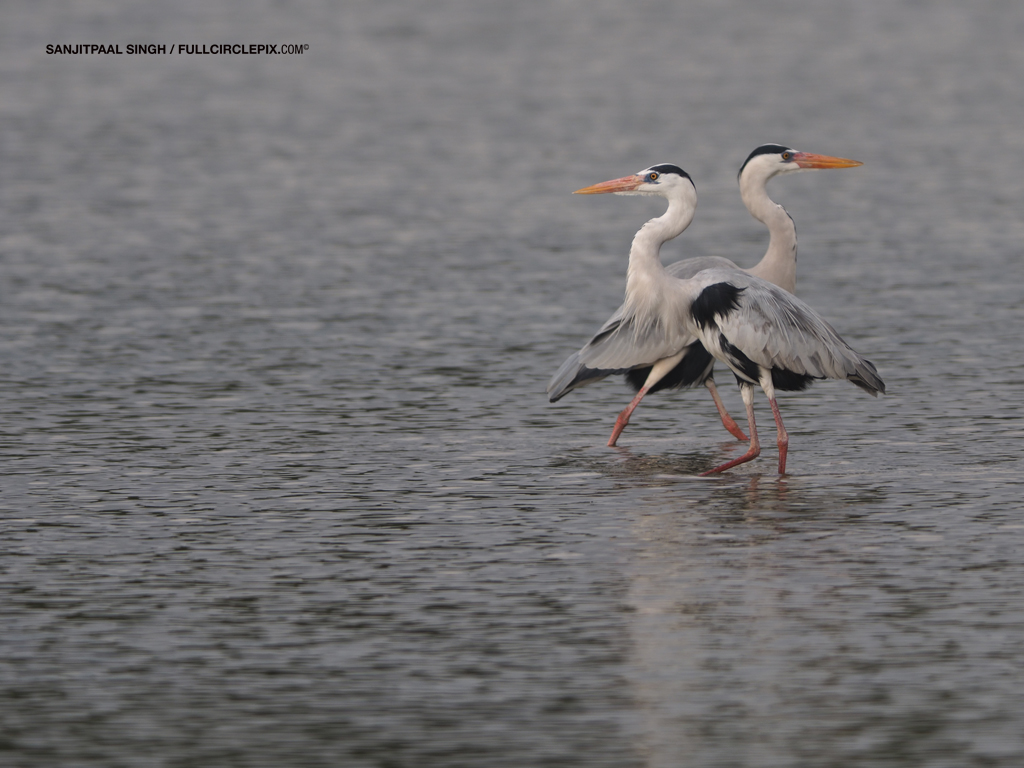
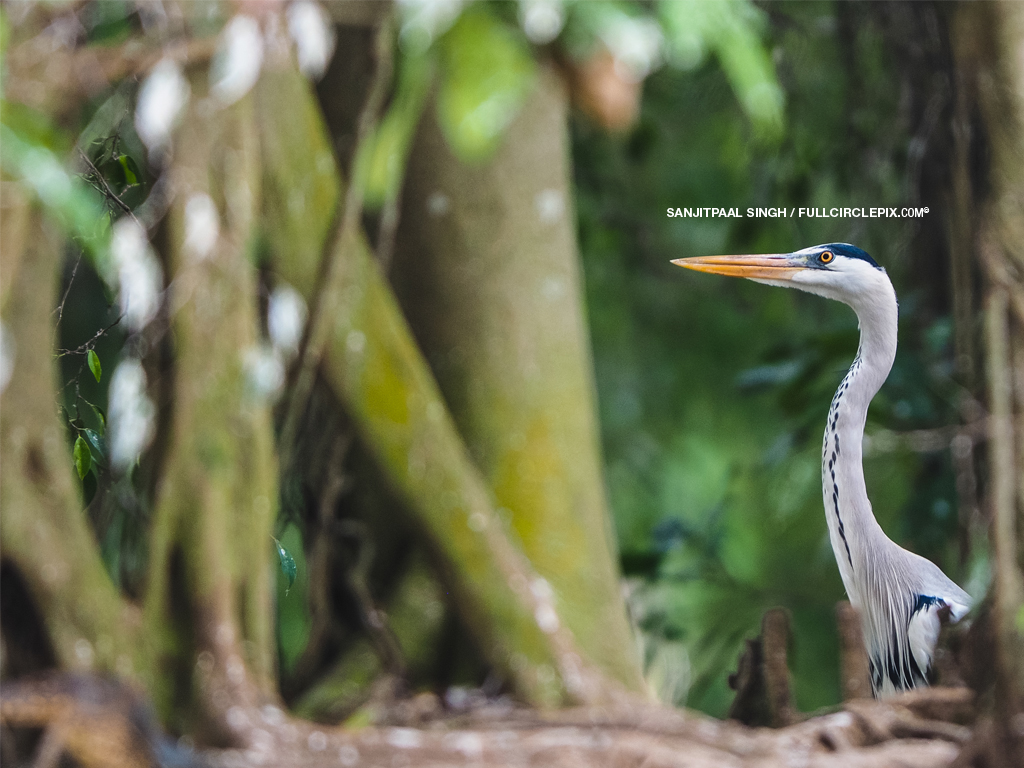
Here’s a bunch of gear i’ve used numerous times before with much satisfaction, i’ve had numerous ‘down’ moments. Faced in low light situations, for instance in the early mornings and late in the evenings when there were numerous flocks of Plain-Pouched Hornbills on migration path between the borders of Thailand & Malaysia (only witnessed deep in the jungles). Or flock of Cattle Egrets swooping into communal roosting areas. This phenomenons in its fullest majesty are least documented.
300mm f/2.8 + EC 2x will give you the (monster) range 1200mm f/5.7 – Awesome!!! The focusing speed did not suffice for fast moving wildlife, furthermore, there wildlife here rather stay in dark & shady areas. Since we’re on the equator and the sun is super hot / hard on midday (slap forehead) (even humans rather take shade).
On a separate note, in other occasions, tigers have leaped out of our way, elephants rolling downhill like thunder (forget your gear – get out!…alive)
So I’ve missed some shots in the past and i venture into 2014 hoping the best in my images.
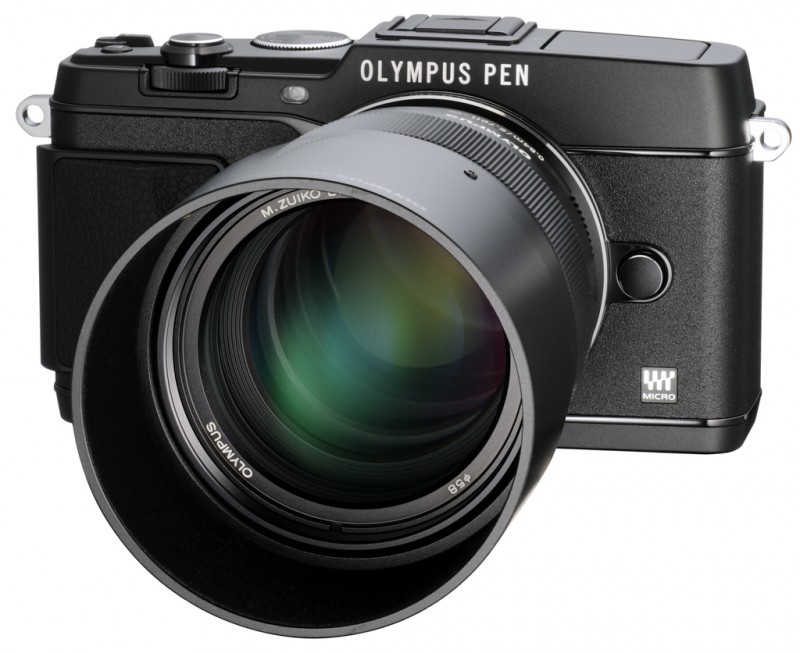
E-M1
I’m a DSLR guy… I’ve utilise the E-PL5 & The PEN & did a whole bunch of EM-5 reviews in 2013 (http://www.youtube.com/user/jitspics/videos) . To my opinion, no other M4/3 camera feels more like a DSLR like the EM-1. Compared to the E-5 this setup on my tripod setup is was much lighter. With the ZD300mm f2. 8 lens leans forward and difficult to balance unless you’re willing to take a risk (pulling your entire system closer to the back for ultimate best balance – risking your camera & lens to fall off while readjusting or transporting from location to location) fortunately, the Wimberley Head 2 has a safety feature to curb this disaster. Kudos to the Singapore suppliers (thats another story)
I’m a DSLR guy… Perhaps i may turn into an occasional DSLR guy.
PERFORMANCE
These are my main concerns while shooting. At most times, i would shoot in manual mode, at times with manual focusing. Since i’m gunning for clean shots that could be used for advertising purposes, my main concentration is as listed below.
WB: Auto
ISO: Varies from Low – 1600
Sharpness: +1
Metering: Spot
Aperture Priority (when applicable): f2.8 or f5.7
Burst Mode: High
File Setting: RAW + LSF
IS: off
ISO
Working on a low ISO is like a mantra to me. The simple reason is to reduce any grain. I always want to get sharp images with a sense of emotions combine with elements of natural lighting and animal behaviour. This is devious. Since most wildlife here are active during the mornings and evenings. Getting tact sharp images is a challenge. Animals tend to hang about in the shade & thick foliage most of the time mainly to be able to dart away from predators.
TACT SHARP &/Vs. GRAIN
“is a compromise as at most times, it’s the moment i want to capture.”
At ISO800 and above, i’d find the grain not to be a little uncomfortable for my liking compared to the DSLR Systems. Grain is more apparent due to the massive depth in shadowy backgrounds. Compared to the E-Systems – there are significant improvements which is to my admiration.
FOCUSING SPEED
I’ve had many ‘aaarrrrggghhh!!!’ moments in the past with the DSLR + 300mm f2.8 + EC 2x TC. With renewed hope i ventured with this system and found myself in a similar situation My setup performs well in well lit conditions. At times, i find the focus hunting which cost me a few ‘misfired’ frames. I’ve also come to realise that might be a lag in the shutter. Wildlife and small birds are very fast and precision is key – i’ve missed a few shots. Furthermore, i find the auto focus with ZD lenses seem even more tricky in low light.
Note: check firmware updates.
“it dims my spirits – but i’m all about ‘stomping’ the shot!”
THE ‘KILLA’ ATTRACTION
After much to do with shooting and one presentation already completed. There was wave of attraction to this setup which puzzled me in different ways all throughout every shoot. This puzzling attraction become more apparent when i was ‘chimping’ from a set of images that almost set me slipped off a cliff! – it’s the astounding details that has captured my attention!!!
IN SUMMARY – PERSONAL HIGHLIGHTS
– 16MP Four Thirds
– Twin control Dials
– ‘5-axis’ IS
– Up to 10fps continuous shooting
– 3” touchscreen LCD + tilts
– Dust, Splash and freeze-proof
– 81 Focus Points
– Light Weight
– Rugged Looking & DSLR feel
– Lightest wildlife camera setup (since i’m not a buff guy) (Handheld shots is possible)
– Super fast AF (Hopefully improves in future when used with ZD Lenses)
– Large Arsenal of Lenses
– Worry free shooting – Display in live view
– Excellent image quality! Details Galore!!!
FINAL THOUGHT
I’m over the moon / impressed and itching to get out there for more shots – with this monster! (gotta head back to my advertising job though – yeah I’m in tough spot)
Dedicated to Timothy McVey – your admiration to my works inspires me to push limits further & beyond as you once said “you’ll never know the end, till you cross the line”. Cheers brotha!’
Sometime back in November 2012, some of my dreams came true – to use a medium format camera, take it outdoors and simply go wild with it! (And return it in one piece)… blown away by its image quality from my 8MP cameras – I set out to gain more from the Phase One 645AF fitted with Schneider 80mm LS f/2.8 & the P30+ digital back
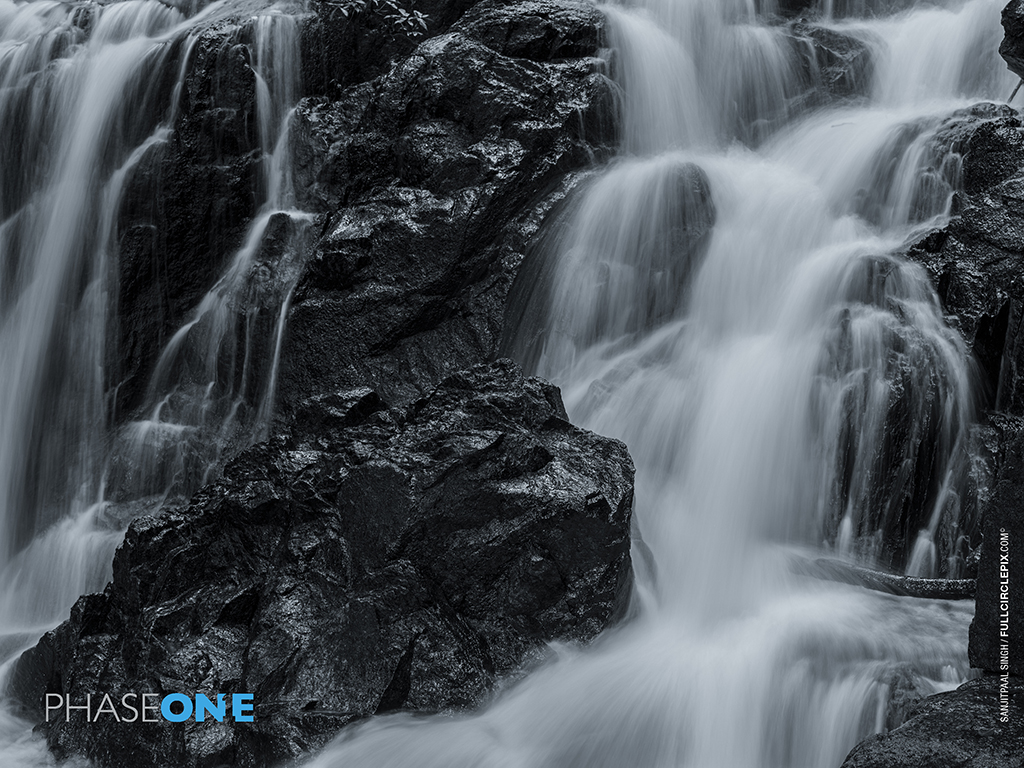
I’ve always had (and still have) a fond admiration with water – its colossal force carves and shapes the earth from the highlands to the sea, and the forest surrounded by freshwater gleams with life. Its majesty in view at lakes and the ocean transcends and soothes the human mind – the endless open space. Water – the lifeblood of our heartland.
This fascinating facet that surrounds us gives not only life and provides us with the essential for everyday use, apart from the adrenalin rush to adventure seekers – as an adventurous photographer myself, it’s the movement, the sense of calmness and intricate details from which surrounded by water, eclipsed in one frame to bring home the emotions of this great force.
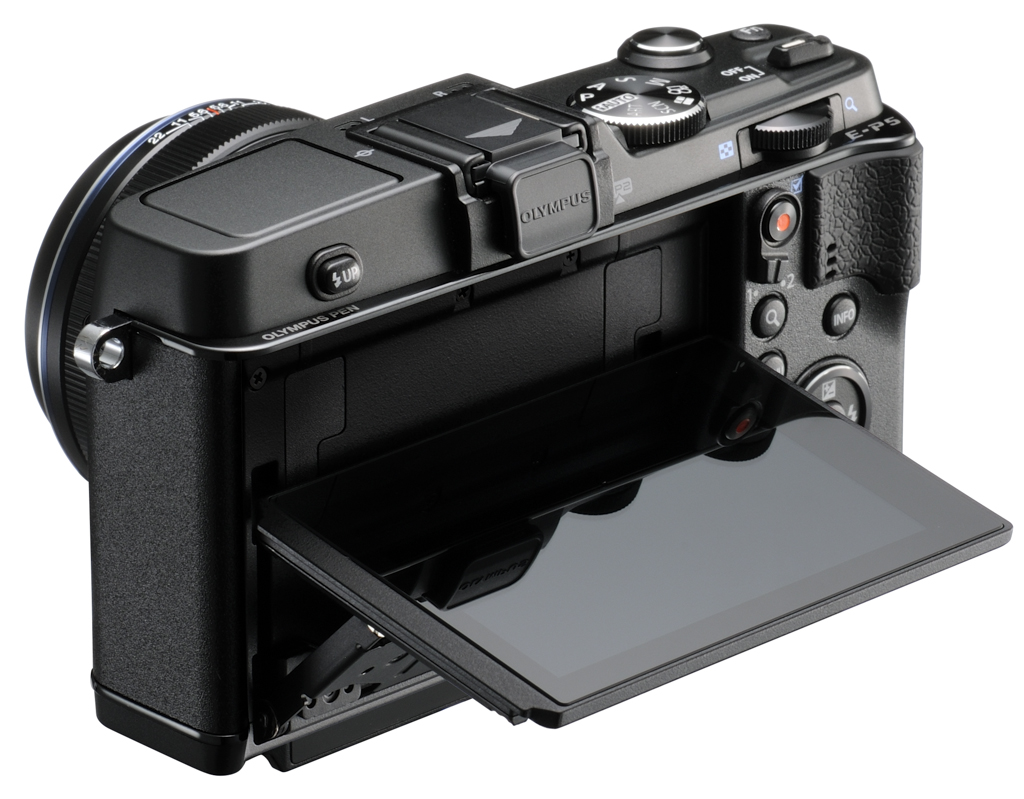
This first impression of the E-P5 preview is based on viewing the camera for the first time and holding it in hand for the touch, feel, and sniff test – all in a personal standpoint. Of course, this was upon invite for a sneak-peak by Olympus Malaysia.
First impressions
There is a wow factor in design and built – sexy, stylish, compact and chick, interchangeable lens, rugged with a classy feel – the list goes on from just laying eyes on the E-P5. The second would be me trying to steal the unit for outdoor testing but that will come soon. My opinion, The E-P5 boast the most impressive blend of design and feel, combination of colours, positioning of buttons infused with tinges of retro design – this is a keeper! I’m more of a DSLR shooter and it’s great to see a couple DSLR features synergized into the E-P5 in which is truly a makers’ mark camera.
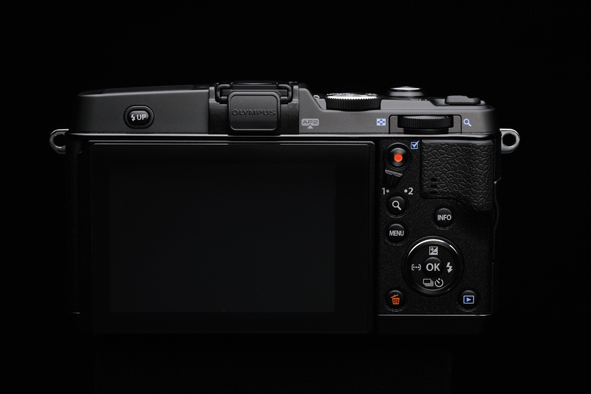
From view, what’s caught my eye is the silver E-P5 with a black band on the front of the body. This ‘universal’ colour combination will certainly be a favorite as it allows any pen users to mount their lenses of any colour and the camera will look classy. An added prestige to the E-P5 design is that there are no visible screws anywhere on the camera body except for the bottom. OLYMPUS PEN phrased in the center top (above lens mount) as a ‘catchy’ statement of premium branding from its earlier days. On the button and functions, there is a greater improvement with the dual dial function close to the shutter release button giving the E-P5 a DSLR feel. The E-P5 is also built with a switch type on off button as found on the E-Systems & OM-D. The E-P5 felt superbly well balanced with solid built and weight. Furthermore, the ‘thumb rest’ as we’d nicknamed it gives the E-P5 ultimate balance – accreting for the heavier and longer lenses. The matt finish is truly a superior finishing to the (no plastic feeling) premium E-P5 – not only it certifies the grip; it boosts confidence of a non-slip DSLR feel. Pop-up flash is just going to give any creative light photographer more star points for easy access to light subjects at any time by simply sync external flash units via RC mode if you’re a ‘flashy’ or ‘Gun and Run’ photographer.
2×2 Dial Controls (DSLR Like)
I always need settings to be changed in every inch of camera movement and these are vital to me while working either hand-held or on tripod – and these need to be literally at my fingertips. At times, knowing the value of exposure changed simply by listening to the clicks on the dials instead of flipping the camera to view the settings changed on its screen. It is its reliability and ease of access on DSLR systems champions the ‘assignment photographer’. These dials are similar to the OM-D System one on the front and on back for quick shift of settings. On default, the dials are set to control the aperture and shutter speed (Manual mode) and these can be further customized to control ISO and White Balance. Literally, convenience on at your fingertips… DSLR style!
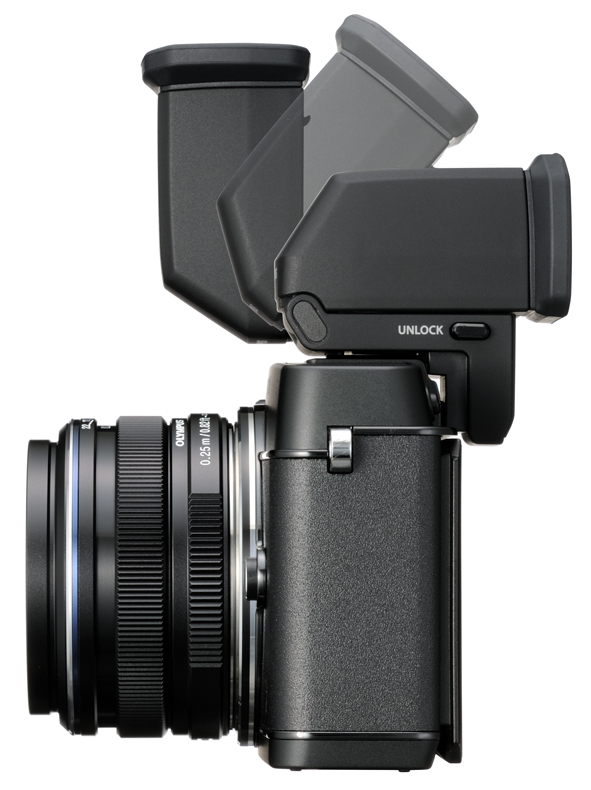
The LCD display on the back of the camera is a tilt screen – it is neatly tucked in place parading as an ordinary LCD screen. It is similar to the OM-D mechanism but its super slim yet robust while tilting. Apart from its ‘magnet like’ snap to place securely, the screen seems to be less reflective and the images can be previewed from various angles clearly. I was taken aback when the camera was placed on the table, spun around various angles and previews were very much visible. Of course, this new and improved (from previous micro 4/3 models) screen is packed with 1037k dot resolution. Not only its produces more details, it has also somewhat been calibrated to be used with the new Electronic Viewfinder, VF-4. No more confusion on the white balance or pulling hair on which display to depend on white shooting.
VF-4 – Electronic Viewfinder (NEW)
Not that I do not enjoy photographing from screen alone, but I’m more of a DSLR guy utilizing the PEN as my travel companion and non-client shoots – I’ve not been convinced by having an electronic viewfinder too close to my eye. I was under the impression that I would be watching a large HD screen in an arms length in fear the worst for my eyes. But I gave it a shot and its reliability was outstanding. The VF-4 seems to be calibrated to the E-P5 screen and it cups around the eye with much comfort. Through it, the preview was sharp from corner to corner with no strain to the eye. Some tech details – 2.36 Million Dot resolution, 1.48x magnifications and 100% field of coverage. This is surely a leap from the previous VF-2.
P/s: No comments on the ‘sniff test’
Tech & notable improvements
16MP Sensor & 5-Axis IS
Though the E-P5 utilizes the same superior sensor as the OM-D and E-PL5 which included much improvement to the high ISO, dynamic range, and finer details, in my view, the reliability is worth the trust. Of course – we might as well put up some sample images if/when we do get our hands on a couple of units. A revolutionary pivot to the OM-D success is the built in 5-Axis IS which made photography and video works a breeze without worrying of the output, such as tested in the OM-D videos where we filmed entirely hand-held on the streets and without camera straps to assist stability. The good news is, the 5-Axis IS in the E-P5 has been rejigged for panning perfection where the built in IS will automatically compensate for the panning action – now I’m eager to test this out. All in all, you’ll have assured image quality and stabilization that might have been used to land a space shuttle.
ISO 100 (Low ISO)
This is one of my first laws of my camera setting mental checklist before any shoot and perhaps another adaptation from pro level DSLR. I’m a fan of low ISO for smooth gradients and best colour output especially for long exposures, interiors, products, beauty shots, etc. The seamless beauty from shoot to output (in print) is always awe inspiring. Back in the day I used to photograph waterscapes with ISO of 64 trans. Compared to the OM-D and E-P3 both with the minimum ISO 200, the ISO 100 in the E-P5 will give you a two stop advantage, which is great while shooting in extremely bright areas with prime lenses for amazing depth of field.
Show-stopping 1/8000sec shutter speed
Here comes the show stopper! At 1/8000sec – you’re able to freeze motion of a buzzing bee in its tracks (provided you have a quick enough trigger finger, depending on the action & light conditions). I’d say this is a big leap from the 1/4000sec from the previous micro 4/3 systems. There could be a new shutter mechanism in the E-P5 in order to allow this.
Focus Peaking
This is simply amazing – you can check the focus areas in real time! By popular demand, this feature is included in the E-P5 and will certainly be a fast growing ‘rule of thumb’ when photographing in Manual mode. Photographers whom utilize ‘Focus-Stacking’ techniques for landscape and macro will surely enjoy this feature as a shooting guide for absolute focus accuracy.
Built in Wi-Fi
Boy oh boy! Technology is certainly making our lives easier. The concept is to shoot and upload to share. Regardless if you’re an Android or Apple user, smart phone or tablet, you will have connectivity to the camera from your ‘smart’ device. This means that you can trigger your camera from a certain distance, copy over selected images from the camera, and upload onto your social media all by syncing your ‘smart’ device to your camera. No internet connectivity needed.
Built-in Intervalometer
No more rigging an egg timer or expensive Intervalometer triggers (timer remote control) – it’s built in! Some DSLR’s have it and it’s now available in the E-P5. The built-in Intervalometer allows you to separate intervals before and between shots after a set delay in camera. A tool sought after by time-lapse shooters.
End note
In my view, it is one awesome looking camera with improved functionalities. It is great to see that the PEN systems are including more of DSLR functionalities such as the dials, ISO100, 1/8000Sec shutter speed, and the built-in 5-Axis IS as added bonus all packaged in a premium design. All in all – for all those eagerly waiting for the Premium Olympus Pen Series make of all time to fall off from somewhere in the Stratosphere – It’s here.
Registration details will be posted on Monday (18th March 2013)
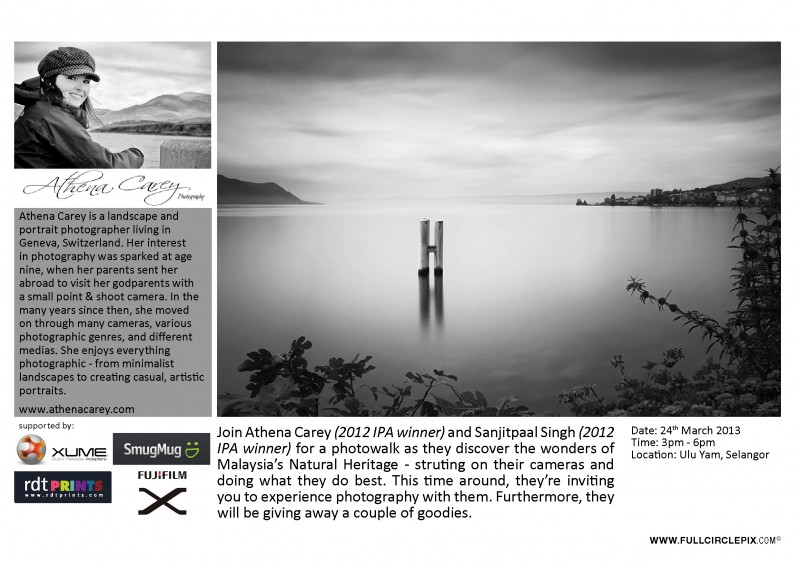
Join Athena Carey (2012 IPA winner) and Sanjitpaal Singh (2012 IPA winner) for a photowalk as they discover the wonders of Malaysia’s Natural Heritage – strutting on their cameras and doing what they do best. This time around, they’re inviting you to experience photography with them. Furthermore, they will be giving away a couple of goodies.
It’s unlikely to take a camera (which would have cost a lifetime of savings – or at least just mine) which has no weather sealing or any sort of protection whatsoever and furthermore a camera strap to the wild. Slippery by wet rugged terrains, unpredictable weather and every possible danger like twigs, branches and thorny bushes seem like flying daggers out of the forest tempted to make their mark on the camera – in this case, it’s the Phase One 645AF fitted with Schneider 80mm LS f/2.8 & the P30+ digital back.
Honestly, it was my sheer curiosity of how this camera would perform in wild that got me into a weekend spiral of hunting ferocious primates such as the stump-tailed macaque (Macaca arctoides) also known as ‘bear macaque’ and river landscapes.
It is my first time working with a medium format camera, which is usually tucked comfortably in a studio – now in the big ‘wild’ world.
– This post is the Behind The Scenes (BTS) story of how we did the OM-D E-M5 videos with some tech details on the video functions
– This is an enthusiast review, my notes and honest opinion on the video capabilities of the OM-D E-M5
– In this post, I will try to cover every point through my brief filming experience with the E-M5
– I’m not a filmmaker, though it’s part of my interests, which would lead this post as part of my learning experience
– p/s: I love cameras of all sorts and constantly indulge myself in visual arts
Of Numerous Posts…
This section is dedicated as a reply to enquiries received on the E-M5 videos. Firstly, yes, all of the OM-D E-M5 videos including teasers we’re filmed using only the E-M5 and M.ZUIKO DIGITAL ED 12-50mm F3.5-6.3 EZ. The BTS video was also done solely with the E-M5. This means that we had 3 units which was the only available arsenal in Malaysia. Mystery solved.
… The Concept
We wanted to create a video showing the capabilities of the 5-Axis IS of the E-M5 which is also packed with full HD features. The idea was to film entirely hand-held and I didn’t even put on a camera strap in which it would have worked to my advantage of further stabilizing the camera while filming.
We wanted to keep it as raw as possible to ultimately come up with an unbiased review.
To throw a curveball into the equation, we filmed entirely without any camera support equipment on the ground (Teaser 01). Though a monopod was used in the videos, it was only to give leverage in angles. The other twist was to film entirely with the M.ZUIKO DIGITAL ED 12-50mm F3.5-6.3 EZ kit lens (kit lens depending on your locality)
Since Robin was going out to test the photo functions, it was the perfect opportunity to film and combine our reviews as a collaborative effort. After all, we’re passionate about photography and still hold on to our daily 9 – 6 jobs.
We only had a weekend of actual filming, with our boots on the ground, we found ourselves running.
The Outlook and Camera Handling…
I must admit that holding onto any bare camera isn’t easy, even more when without a camera strap or the HLD-6 (Power Battery Holder). We transported the E-M5 in a sling bag, holding onto the monopod when mounted and the lens when carrying around. Dropping the E-M5 in any event would have been a disaster and we had to be of extreme alertness at all times.
Though we filmed throughout the entire weekend, starting as early and finishing as late as possible, handling the video mode was a breeze. As easy as compose, focus and hit the red button to record. Holding the E-M5 like any conventional DSLR and even with just one hand like a compact, keeping the IS1 turned on at all times to ensure best results in every shooting condition.
The camera handled well as a hand-held unit with much stability and comfort through long filming hours.
On using a monopod to leverage on angles, depending on how you mount the E-M5 onto the monopod will give you full advantage of view of the flip screen. This is via trial and error. Of course, I discovered this while being limited to flip the screen out entirely.
Production …
The E-M5 is packed with HD movie recording with the resolution of 1920(H) x 1080(V) and 30p (29.97fps). We filmed only in this format (.MOV being the output file) with the IS-1 turned on all throughout the filming period.
The 5-Axis IS certainly blew me over the moon. We’ve walked up and down stairs, dodged humans and traffic, trailed Robin while walking, filmed in dark locations, panned, swept, laughed and giggled while filming and still managed to get steady shots.
While recording, I realized that there wasn’t an audio indicator as conventional 3CCD cameras comes with a built-in headphone jack but a quick file preview to check the audio left me confident to continue filming.
… Screen, EVF, Battery Life and AF
Throughout the entire production, I relied entirely on the screen. This is to ensure that we’re getting everything that we wanted framed within the screen. Working through the viewfinder could prove to be hazardous while working on the streets and populated areas. The screen also gave much leverage on low and high angles. This way, I could keep an eye on the rushes while another on oncoming traffic. At one point of filming, the EFV got fogged up and the screen was left entirely blank. But there’s a working option to turn off the EVF sensor to fully being dependent on the screen.
For any filmmaker, battery life would be a concern. From a full charge worked about 7 hours of continuous filming with much breaks in between. Uniquely for our videos, we were going for short clips for the final edit and I conserved battery as much as possible during breaks in between.
The AF style is similar to the photography mode. If you’re used to taking pictures, the AF is an advantage is selecting your style. Though I filmed almost entirely using S-AF, I used the AF-Tracking mode for the insect and trailing / walking shots. Once again, I composed and locked the AF before recording.
Post-Production…
At this point, we’re snowed under working up to 4am at almost every night for two weeks because this camera is way too incredible to keep a secret.
All post works we done in my ‘home office’, which is a small room with a relatively powerful computer. Once I’ve selected the shots and music for the rough cut, Robin and I worked together in firming up the script. We then recorded the Voice Over (VO) via connecting the Olympus-ME31 and SEMA1 to the E-M5.
We then placed in transitions, credits, VO and background music, rendered and exported as an .FL4 to be uploaded to YouTube using Adobe Premier Pro (CS4)
Though I’ve had this software bundled quiet sometime ago, I’ve hardly worked on it apart from using it to only convert files from various cameras.
Recap – My Likes & Some Room for Improvements
Shooting hand-held
The idea of working the E-M5 entirely handheld was to challenge the new 5-Axis IS. Honestly… it’s remarkable (and I’m still over the moon). Since we had a very short production window, we worked in locations we’re familiar with to give us the upper hand with time.
Easy handling
A good start for anyone who is interested in videography. The E-M5 could work as your backup unit (depending on your current recording file format) and even as a BTS camera. Even if you’re into family vacation videos, this one unit will give you amazing photo and HD video quality output.
Apart from that, it’s compact doesn’t draw as much attention when using larger cameras to film.
Output quality
This is certainly a huge improvement from my AVCCAM which is a semi HD and cost 4 times more than the E-M5. The E-M5 is also much less complicated to function and gained more points with me for its new IS.
Audio
We’ve got crisp surround audio from the E-M5. Samples are on the CAUGHT sections. In other filming scenarios such as an indoor conference, it would be an advantage to mount a directional microphone on the camera itself. An output headphone jack would also be another plus point and usually in these situations, I would also like to monitor the audio levels on the screen while filming.
Special Thanks
To my wife : For assisting us in every way imaginable throughout the entire production and bearing with my crazy schedule all throughout. Thank you for your understanding, support and loving kindness.
Olympus Malaysia: For the opportunity in realizing our passions lived. For all your support in loaning us the gear even at last minute requests. Your time spent with us listening to our ideas. Your trust in us – no cameras was harmed. We did get a couple of units soaked but I guess its all good.
Robin Wong: For your efforts, your secrets and all the blog posts. You’re truly an amazing person to work with the passion and the right attitude in facing new challenges.
Silent scenery: Though we’ve not personally met, you’re an awesome bunch. Thank you for allowing us to use your music voluntarily for it has given our videos a kick and a punch. ROCK ON you guys.
The world: To all photographers/artists that has shared your works online and in magazines. Cheers to you for the inspiration, motivation, your innovation and contribution to the industry.
Friends (my brothers and sisters): For keeping me going.
To everyone that had viewed, read, commented, liked, responded… thank you.
Note to self… “Can you do post production?” Well, I understand the concept & I can learn.
It’s been a great journey with the OM-D E-M5 and we’re closing in to the final segments of the reviews. This time, Robin Wong wraps up his EM-5 journey… Just before…
More here, cause it’s…
(done by) http://www.fullcirclepix.com
(in collaboration with) http://www.robinwong.blogspot.com